Here’s a quick guide on how to populate my custom designed Genesis/Mega Drive reproduction PCBs. It supports most Genesis games.
Front Side


U2 – EPROM
Needed for: Every game
Part Number: 27C322 or 27C160
Function: Holds the ROM file
How to Program: Use an EPROM programmer and load the ROM file; be sure it is byte-swapped before programming. ROM preparation is detailed below.
C1 – Electrolytic Capacitor
Needed for: Every game
Value: ~22 uF, at least 10 V rated
Function: Smooths out supply voltage for the board due to transients on the power supply, prevents quick changes in supply voltage when power is turned off.
CB – Electrolytic Capacitor
Needed for: Games that save
Value: ~22 uF, at least 10 V rated
Function: Prevents transient voltage drops on the SRAM during power-down.
C2 – Ceramic Capacitor
Needed for: Every game
Value: ~0.1 uF, at least 10 V rated
Function: Filters out high-frequency noise that can interrupt the EPROM.
C3, C4, C5 – Ceramic Capacitors
Needed for: Games that save
Value: ~0.1 uF, at least 10 V rated
Function: Filters out high-frequency noise that can interrupt the SRAM, Flip-Flop, and Decoder.
R1, R2, R3, R4, R5 – Resistors
Needed for: Games that save
Value: 1 kΩ for R1 and R4, 10 kΩ for R3 and R5, 100 kΩ for R2
Function: Part of the battery management and saving logic circuit.
D1, D2, D3 – Diodes
Needed for: Games that save
Part Number: Low reverse leakage diodes (BAT85 is suggested)
Function: D1 and D2 combine the battery and Genesis voltage rails to power the SRAM and keep it working after the power is turned off. To lengthen save data retention, it’s better to get diodes that have a low reverse leakage. D3 keeps /VRES from staying high while the supply voltage drops.
Q1 – NPN Transistor
Needed for: Games that save
Part Number: BC547 is recommended, 2N3904 works as well
Function: Part of the battery management and saving logic circuit, also forces the SRAM into a low-power state when the game is turned off. Please note which pins are emitter, collector, and base.
U3 – D-type Flip-Flop
Needed for: Games that save, for ROM files that are larger than 16 Mbit
Part Number: 74HC74 or equivalent
Function: Part of the saving logic circuit.
U4 – Decoder
Needed for: Games that save
Part Number: 74HC139 or equivalent
Function: Switches between activating the ROM or the RAM during gameplay.
U5 – SRAM
Needed for: Games that save
Part Number: 62256 series SRAM (be sure to get low standby current model)
Function: Holds save game data.
B1 – Battery
Needed for: Games that save
Part Number: C2032
Function: Keeps the SRAM on to retain data while power is off. Note: buying name brand batteries from reputable sellers will guarantee you rated battery life – unbranded ones might not last as long.
Solder Pads
If your game does not use a 74HC139: Bridge the solder pad on the right of the 74HC139 socket to bypass the circuit
If your game uses SRAM: Bridge the solder pad in the right hand corner – if you want to clear a save game, desolder this pad to discharge the SRAM power supply, and then reapply solder to re-enable it.
Back Side

Solder Pads
EPROM selection: Bridge the pads in the middle of the board based on which EPROM you are using – the 27C160 or 27C322
ROM size selection: Bridge the pads on the left for games 16 Mbit or less, on the right for games larger than 16 Mbit (this is only necessary for games that save). Solder based on the original ROM file size – if you expand a 16 Mbit game to 32 Mbits, for example, you should still use the “16 Mbit or less” solder pad.
Preparing the ROM
When programming Genesis games, you need to make sure you byte swap the ROM file before you program it. For this, I use the GQ-4×4 programming software – you don’t need to have a GQ-4×4 to use this software! You could just use it to byte swap your ROM and then save it to use a different programmer. To byte swap, just load up your ROM in the software, and click the “A<>B” button.
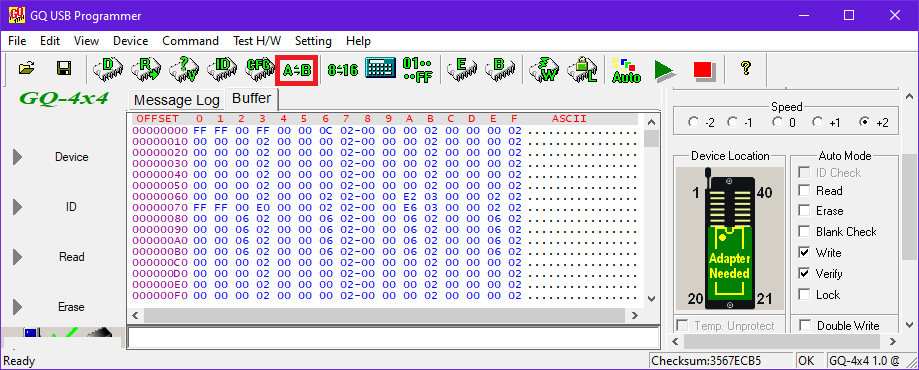
You can then save the ROM to use in another programmer, or go ahead and program with your GQ-4×4.

Hi. For 29fXXX Swap in necessary? Thanks a lot
LikeLike
Hi.
Can you please share the schematics?
I have a pirate board that doesn’t save and would like to build the circuit around it.
To buy another board and do a “transplant” is not an option, since the EPROM is an epoxy blob. 😦
Thanks in advance.
LikeLike
Thanks my friend,you is genial
LikeLike
I should update these pages. I just have so much to do!
I put a recreation of the boards on my Github. I haven’t ordered and tested them yet, but the schematics should be accurate.
Click to access schematic.pdf
LikeLike
Thank you!
These schematics will sure help me a lot to fix my old “junked” suff!
LikeLike